What is VQMP?
VQMP – Advanced QA/QC Media Player
VideoQ VQMP is a Windows OS real-time media player that can be used as a stand-alone QA/QC tool, or as a remotely controlled automatable viewer, or it can work in close cooperation with other tools, such as VideoQ VQV player-analyzer.
Key Information
- Home Page: VideoQ website
- Product Page: VideoQ VQMP advanced media player
- Companion Tool: VideoQ VQV player-analyzer
- Core Engine: Based on MPV with custom VideoQ enhancements
Remote Control Capability
VQMP via built-in server can report its status and it can be controlled by short command messages containing:
- 1st argument: Full path to media file, URL or network protocol address
- Optional 2nd argument: Timeline position within media file in s.ms format
Copyright © 2025 VideoQ. All Rights Reserved.
Features
VQMP offers comprehensive features for professional video quality control and analysis:
Core Features
- Format Support: Based on MPV core engine, VQMP supports nearly all media formats, up to 8K UHD HDR/SDR,
using ffmpeg-based hardware accelerated decoder - HDR Support: HDR to SDR conversion for easy HDR preview on SDR screen
- Audio Engine: Multi-channel audio rendering engine, up to 7.1 surround sound
- Smart File Opening: Configurable use of last-used timeline position and track controls
- Recent Files Manager: Unlimited multi-page recent files list
- Timeline Navigation: Fast intuitive timeline navigation, including switchable overlay messages, bookmarks,
and GoTo Manager - Smart Controls: Speed/scale/zoom/pan controls with info overlays
- Playlist Manager: Internal and external playlists support
- Track Selection: Smart video, audio and subtitle tracks selection
- AV Monitor: Advanced AV Monitor with sophisticated overlays and messages, various modes of operation
Copyright © 2025 VideoQ. All Rights Reserved.
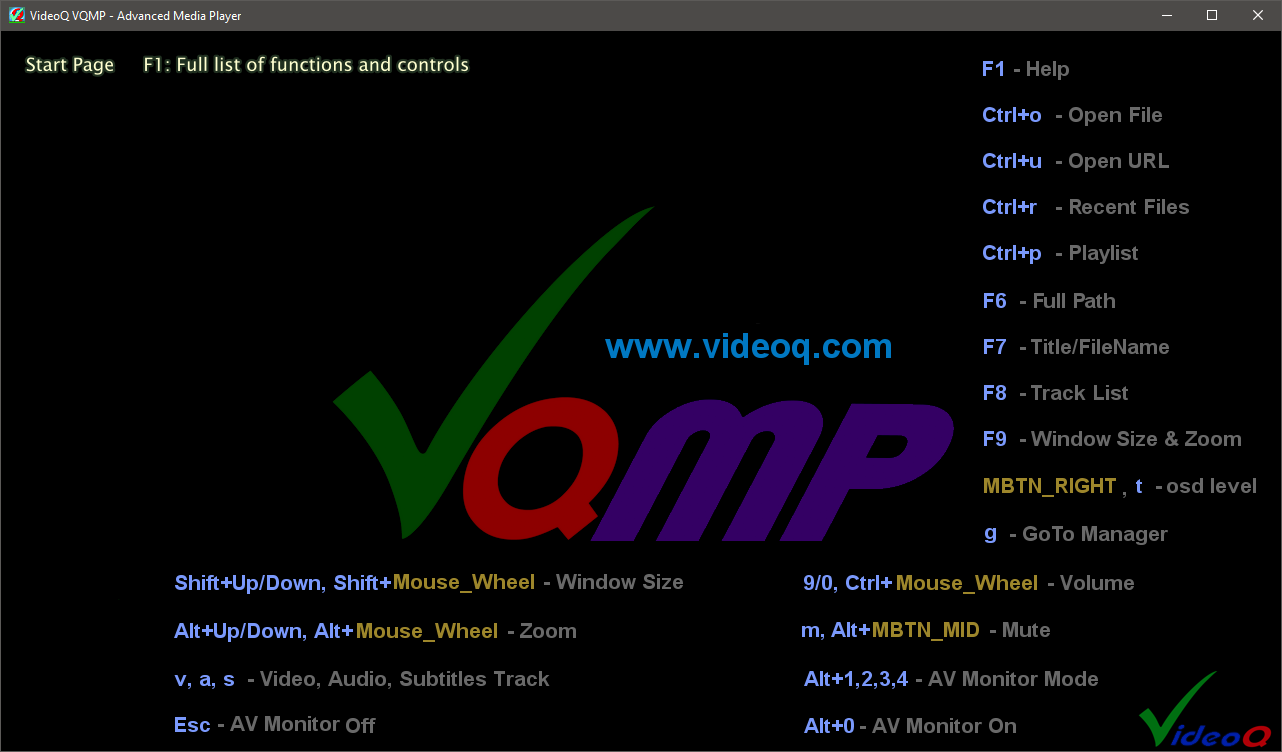
Start Page – Shortcuts Guide
Clicking on VQMP icon or launching vqmp.exe without any arguments in the command line results in Start Page display. It shows handy Main Controls Short Guide and also works as a background for Recent Files List display.
Copyright © 2025 VideoQ. All Rights Reserved.
Keybindings
VQMP uses a combination of MPV built-in keybindings and custom VideoQ keybindings. Some built-in MPV keybindings are still in use by VQMP, some of them disabled, and some others replaced by VideoQ keybindings.
↓↓↓
↑↑↑
Important Notes
- All upper-case keys below mean Shift+key
- Dynamic keybindings are valid only while the related mode is active
- For developers and advanced users: MPV manual
Copyright © 2025 VideoQ. All Rights Reserved.
File Manager
File, URL, and Playlist Opening Controls
| Key | Action |
|---|---|
| Ctrl+o | launches File Open Dialog, the selected file will replace currently playing file or playlist. |
| Ctrl+a | launches Add File Dialog, the selected file(s) or playlist(s) will be appended to the playlist. |
| Ctrl+u | brings up URL text edit box pop-up. Paste your URL into it. |
| Ctrl+R | re-opens (close and re-open) the same file, e.g. to reveal changes due to external processing. |
| Alt+a | launches Add Subtitles File Dialog, the selected file will be appended to the subtitles list. |
Image Sequence Playback
To open and play a sequence of numbered image files:
- Open first any one of the sequence image files using Drag-and-Drop, regular Ctrl+o File Open Dialog, or Ctrl+r Recent File List. This will open just one static image.
- Then use Alt+i shortcut to open and play the sequence of all numbered files sharing the selected file folder path and extension.
The default sequence playout frame rate is 24 fps. It can be changed via dynamic Ctrl+f and Ctrl+y keybindings.
Supported frame rates: 1, 10, 23.976, 24, 25, 29.97, 30, 48, 59.94, 60 fps
Supported extensions: bmp, dpx, exr, gif, j2k, jp2, jpg, jpeg, png, psd, tif, tiff, webp
Copyright © 2025 VideoQ. All Rights Reserved.
Recent Files Manager
Ctrl+r toggles Recent Files List display ON/OFF. Also, this enables all corresponding dynamic bindings.
Strictly speaking, better wording could be 'Recent Sources', because the list includes AV files and URLs.
Recent Files Manager Dynamic Keybindings
| Key | Action |
|---|---|
| ENTER,MBTN_LEFT | Open the higlighted item from the current list page |
| 1-9 or 0 | Open the numbered item from the current list page |
| UP,DOWN,WHEEL_UP,WHEEL_DOWN | Move the selection highlight (scroll the list), one item at a time |
| PGUP,PGDWN | Scroll the list, one page (10 items) at a time |
| DEL | Delete the highlighted item from the list, and move the selection highlight to next available item |
| ESC | Switches list display OFF |
Color Scheme
Handy selected item highlighting color scheme dynamically assigns different colors for:
- Video and image files – Cyan
- Audio files – Brown
- URLs and streaming protocols – Light Blue
- Currently non-available resources – Red with warning prefix NOT FOUND:,
e.g. files on the disconnected drive or renamed files
Note: Recent Files Manager and Playlist Manager are mutually exclusive. Thus, if Playlist Files Manager was used, then launch of Recent Files Manager will auto-reduce playlist to just one item - currently playing file.
Copyright © 2025 VideoQ. All Rights Reserved.
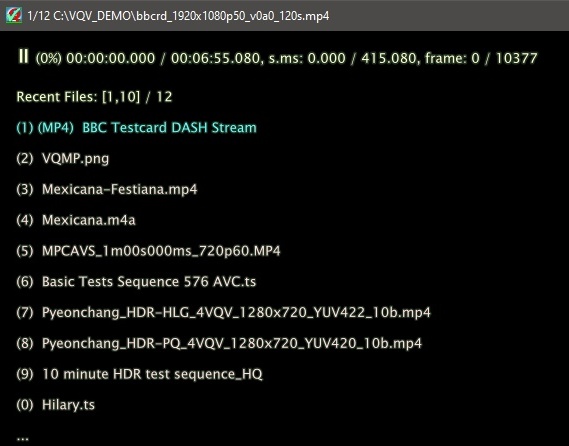
Recent Files Manager Usage Examples
Within the displayed list all file names and URls are replaced by media titles (if available).
Full path to the selected resource is displayed in the VQMP window title bar (small size font).
The selected item highlight color depends on the resource type and availabilty. Within the displayed list all file names and URls are replaced by media titles (if available).
Example 1: The selected video file title is shown in cyan:

In Recent Files Manager mode VQMP window title bar shows full path and file name:

Note that in regular playback mode VQMP window title bar shows only file name, not the full path. If necessary, press F6 to see full path as on-screen message.

Example 2: The selected URL title is shown in Light Blue:

Note that in URL playback mode VQMP window title bar shows the title, not web address. If necessary, press F6 to see web address as on-screen message.

Example 3: The selected audio file name is shown in Brown:

Example 4: Currently non-available resources are shown in Red:

In Recent Files Manager mode VQMP window title bar shows full path and file name:

Copyright © 2025 VideoQ. All Rights Reserved.
Playback Controls
Basic Playback Controls
| Key | Action |
|---|---|
| SPACE, p, MBTN_MID | Toggle pause/play. Also hide Recent Files List and Playlist overlays |
| q | Quit to watch later: save timeline position and quit |
| Q | Delete watch later timeline position data and quit |
Playback Speed Controls
| Key | Action |
|---|---|
| ],Ctrl+Alt+f | Increase speed: .05, .15, .3, .5, 1, 2, 3, 4, 10, 20 |
| [,Ctrl+Alt+s | Decrease speed: 20, 10, 4, 3, 2, 1, .5, .3, .15, .05 |
| { | Set play direction backward |
| } | Set play direction forward |
| Backspace | Reset normal speed 1 and forward play direction |
Audio is mute and audio monitor is disabled for speed values below 0.3 and above 4.
For each new file opened the playback controls are reset to normal speed 1 and forward play direction.
Copyright © 2025 VideoQ. All Rights Reserved.
Video, Audio and Subtitles Tracks Selection
| Key | Action |
|---|---|
| F8,v,a,s | Show tracks list |
| v | Cycle through video tracks (streams) |
| a | Cycle through audio tracks (streams) |
| s | Cycle through subtitles tracks |
| J | Cycle subtitles tracks backwards (MPV built-in keybinding) |
| Ctrl+Alt+RIGHT | Pause and go to next subtitle position |
| Ctrl+Alt+LEFT | Pause and go to previous subtitle position |
Copyright © 2025 VideoQ. All Rights Reserved.
Working with Subtitles
| Key | Action |
|---|---|
| S | Cycle subtitles scale (relative font size) |
| r | Move subtitles up |
| R | Move subtitles down |
| Ctrl+Alt+RIGHT | Pause and go to next subtitle position |
| Ctrl+Alt+LEFT | Pause and go to previous subtitle position |
Subtitles scale (relative font size) list:
1.(default), 1.1, 1.2, 1.3, 1.4, 1.5, 1.6, 1.7, 1.8, .5, .6, .7, .8, .9
Going to previous/next pre-fetched subtitle position also jumps to matching video & audio timeline positions.
Copyright © 2025 VideoQ. All Rights Reserved.
On-screen Messages
Cycle OSD Levels 0,1,2,3
| Key | Action |
|---|---|
| t, MBTN_RIGHT | Cycle osd-levels: 0, 1, 2 (default), 3 |
OSD Levels Explained
OSD Level 0
Time-line messages OFF (thus showing "clean video image"). ~1s long pop-up - only to inform user. Selection of osd-level 0 means that not only the topmost line, but nearly all other osd messages will be hidden.

OSD Level 1
Current timecode / duration timecode (minimalistic mode)

OSD Level 2 (Default)
Maximum of current and full duration details:


- On pauses: timecodes, time positions in s.ms, frame numbers
- On play: time positions in s.ms are hidden, video and audio bitrates added
OSD Level 3
Medium details level. As level 2, but without bitrate information, frame numbers - only on pause

Note: Levels 1, 2, 3 always show play / pause / seek / wait symbol and time position in %. For non-unity speeds, speed info is inserted after timecode values.
After each change of level the 2nd (and optionally the 3rd) message lines appears for short time. It shows: AV container, frame size, frame rate, and other AV parameters.

Important: VQMP scripts may override the user selection by forcing the particular osd-level - 1, 2 or 3.
Copyright © 2025 VideoQ. All Rights Reserved.
Sound Volume
VQMP provides built-in audio volume controls with visual feedback.
| Key | Action |
|---|---|
| m, Alt+MBTN_MID | Toggle mute ON/OFF |
| 9, Ctrl+WHEEL_UP | Increase volume |
| 0, Ctrl+WHEEL_DOWN | Decrease volume |
| =, Shift+MBTN_MID | Reset all user controls, including volume |
Full volume control range: 0% .. 130%. 0% means mute.
Note: Volume controls do not affect any audio analyzers/indicators, e.g. Audio Level Meter.
Default 50% volume value (mute OFF) is reset for each new file opened.
Any change of volume control invokes the corresponding text message and OSC Volume Bar overlay.


Copyright © 2025 VideoQ. All Rights Reserved.
AV Monitor Mode Controls
For video files with internal or external audio streams
| Key | Action |
|---|---|
| Ctrl+MBTN_MID | Toggle AV Monitor ON/OFF |
| Alt+0 | Switch AV Monitor ON |
| Alt+ 1,2,3,4 | Select/Preselect AV Monitor Mode 1,2,3,4 |
| M | Cycle thru AV Monitor Modes 1,2,3,4 |
| ESC | (dynamic keybinding) Switch AV Monitor OFF |
For video files without internal or external audio streams
In such case only Mode 1 (Video Monitor) is available.
| Key | Action |
|---|---|
| Ctrl+MBTN_MID | Toggle AV Monitor ON/OFF |
| Alt+0 | Switch AV Monitor ON |
| ESC | (dynamic keybinding) Switch AV Monitor OFF |
For audio files Audio Monitor is always ON
Switch between 2 modes:
| Key | Action |
|---|---|
| M, Ctrl+MBTN_MID | Toggle between Modes 3a and 4a |
- Mode 3a - Advanced Audio Monitor (default)
- Mode 4a - Large Audio Waveform Monitor
AV Monitor Modes and Tools used
Multi-channel Audio Level Meter:
Audio Level Meter is available in all 4 Modes - 1,2,3,4Video tools used in Mode 1:
UV Vectorscope, RGB Histograms, YUV Waveforms, RGB WaveformsAudio tools available in Modes 2,3,4:
Audio Waveform Monitor, Vectorscope, Frequency Spectrum, EBU R128 MonitorLearn more about AV Monitor modes in 2 following sub-sections:
- AV Monitor Modes Explained
- Audio Monitor Explained
Copyright © 2025 VideoQ. All Rights Reserved.
AV Monitor Modes Explained
Press Alt+ 1 | 2 | 3 | 4 to pre-select or select the corresponding AV Monitor Mode.Mode 1
Video tools: UV Vectorscope, RGB Histograms, YUV Waveforms, RGB Waveforms. Audio tools: Level Meter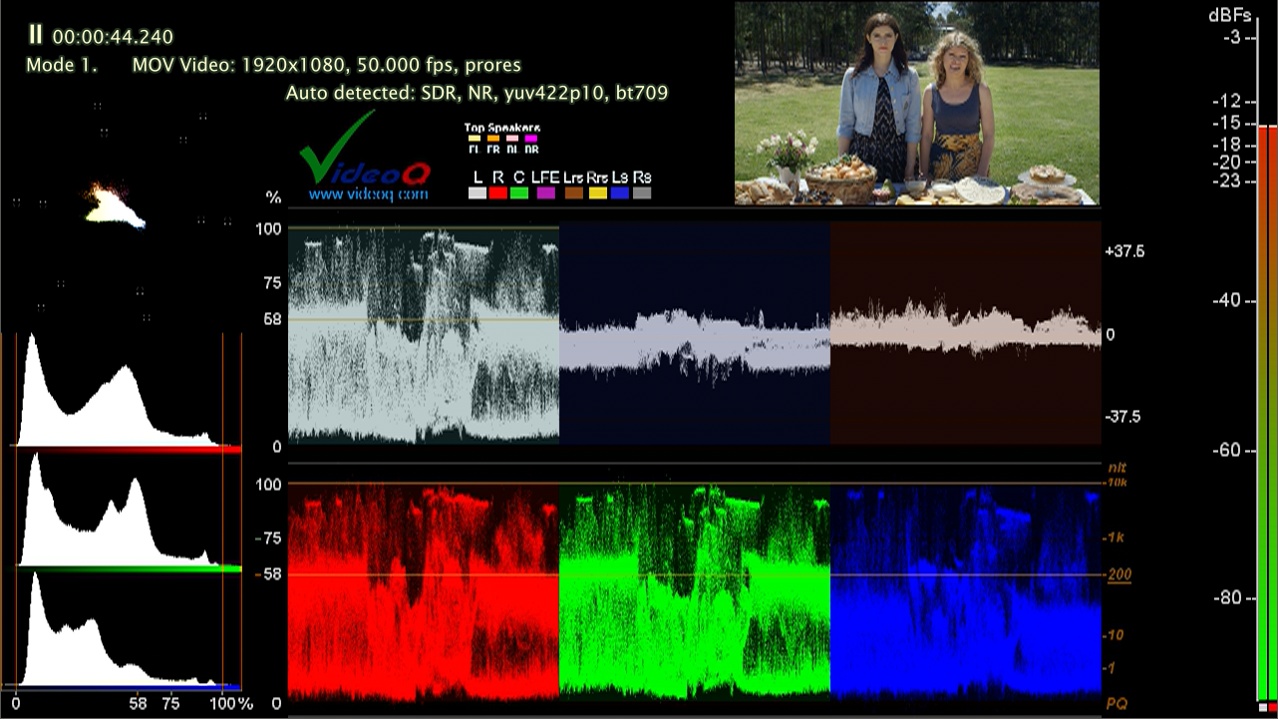
Mode 2
Audio tools: VectorScope, Frequency Spectrum, EBU R128 Monitor Readout, Waveform Monitor, Level Meter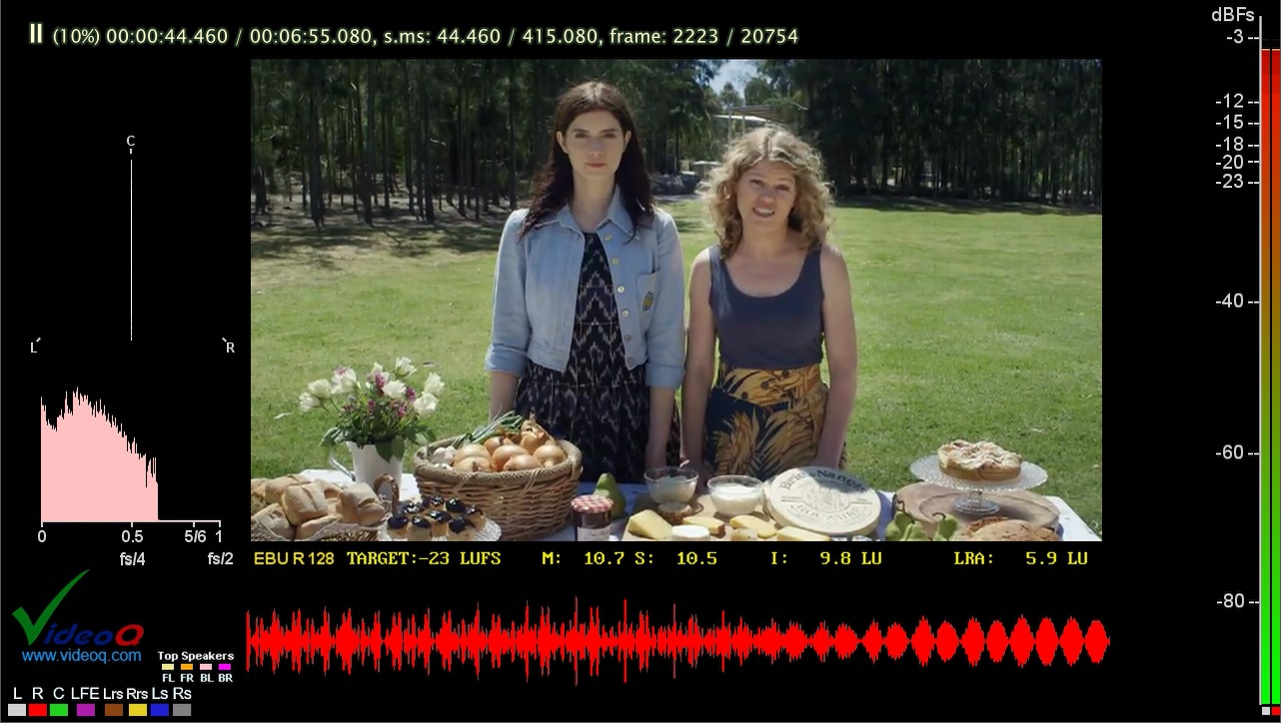
Mode 3
Audio tools: VectorScope, EBU R128 Monitor, Waveform Monitor, Level Meter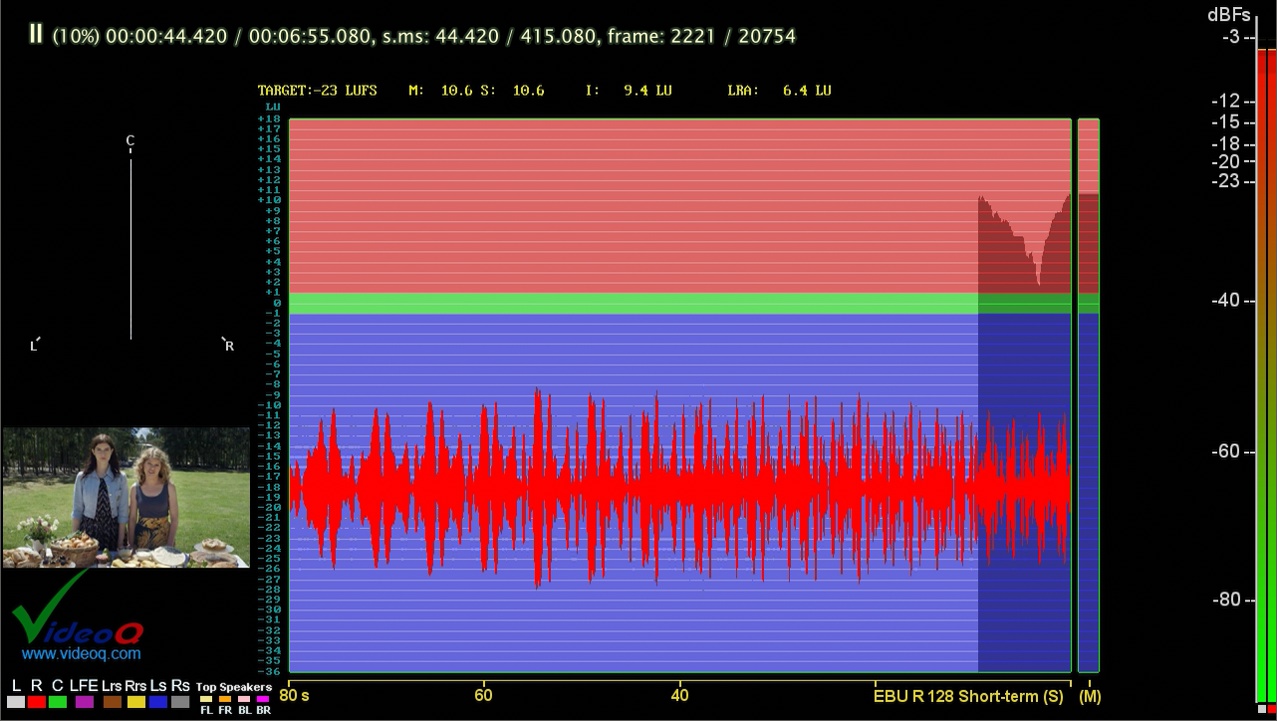
Mode 4
Semi-transparent Audio Level Meter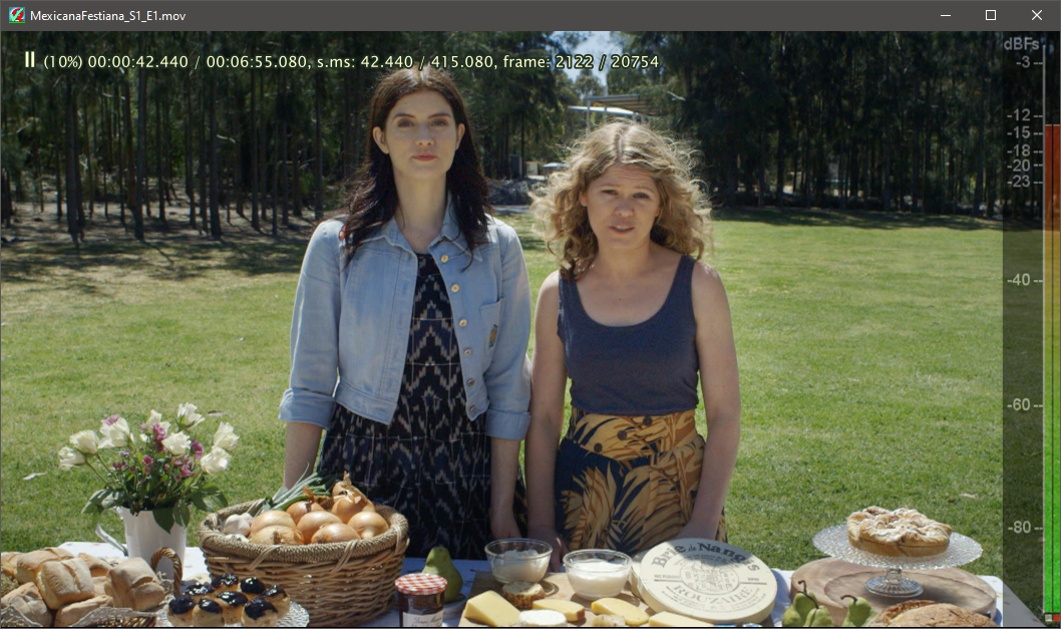
Copyright © 2025 VideoQ. All Rights Reserved.
Audio Monitor Modes Explained
For audio files Audio Monitor is always enabled.Press M or Ctrl+MBTN_MID to switch between 2 modes: 3a and 4a.
Audio Monitor Mode 3a
This mode is enabled by default for each new audio file opened.Audio tools: VectorScope, Frequency Spectrum, EBU R128 Monitor, Waveform Monitor overlay, Level Meter

Audio Monitor Mode 4a
Audio tools: Large Waveform Monitor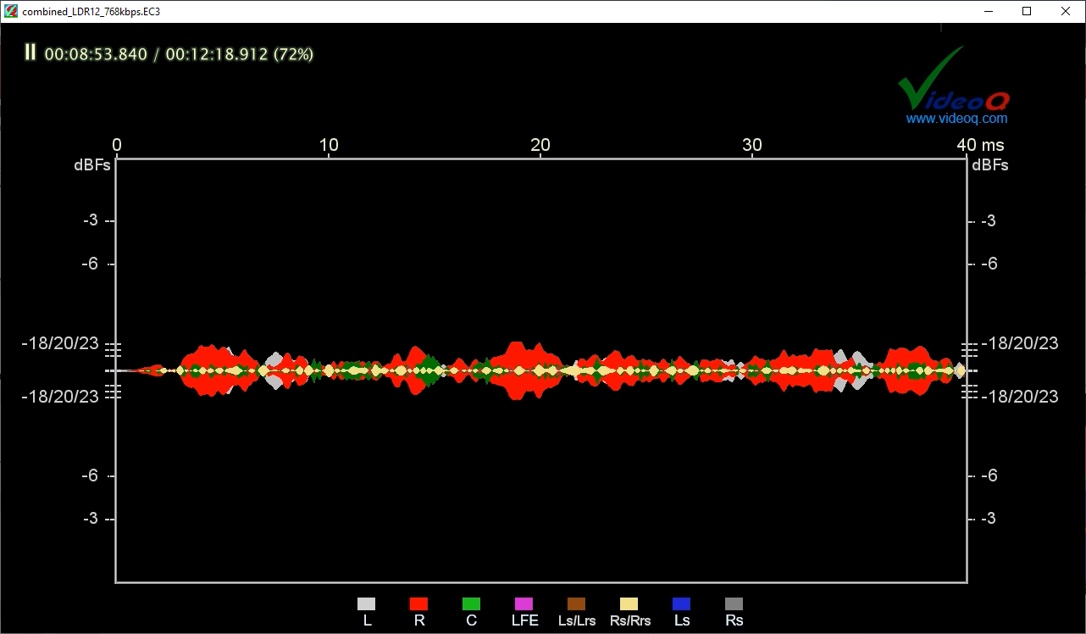
Copyright © 2025 VideoQ. All Rights Reserved.
Timeline Navigation
There are several ways to control the timeline position.They can be used separately or together.
Navigation Methods
- GoTo Manager - Jump to specific timecodes
- Bookmarks - Store and recall timeline positions
- Relative Timeline Position - Direct timeline control and frame-stepping
- Chapters - Navigate through chapter markers
- Loop - Set A-B loop points
See the following sub-sections for detailed descriptions of each navigation method.
Copyright © 2025 VideoQ. All Rights Reserved.
GoTo Manager
GoTo Manager Controls:
| Key | Action |
|---|---|
| g | Toggle editable "GoTo" timecode string overlay |
| b | Store current timeline position as GoTo record (volatile bookmark) |
GoTo Manager dynamic keybindings:
| Key | Action |
|---|---|
| LEFT, RIGHT | Move to previous/next digit position |
| 0 .. 9 | Enter current digit and move right to next digit |
| BS | Clear current digit (set 0), then go left to previous digit |
| UP, DOWN | Scroll through the GoTo history (volatile bookmarks) |
| ESC | Cancel current timecode string editing and remove the overlay |
| ENTER | Seek to the displayed timeline position |

GoTo Manager history list size is practically unlimited, and it can be used for setting up very handy editable volatile bookmarks, valid across multiple media files, e.g. Recent Files, whilst the VQMP is running.
Copyright © 2025 VideoQ. All Rights Reserved.
Bookmarks
Bookmark Controls:
User can store and recall up to 4 permanent bookmarks (file path and timeline position) stored in bookmarks.json file.
| Key | Action |
|---|---|
| Ctrl+Alt+1,2,3,4 | Set (store filename and current timecode) bookmark #1,#2,#3,#4 |
| Ctrl+1,2,3,4 | Recall (seek stored filename and position) bookmark #1,#2,#3,#4 |
| Ctrl+Alt+0 | Peek the bookmarks list, i.e. filenames and positions in 4 bookmark slots |
| Shift+Ctrl+BS | Set one revert-seek mark |
| Shift+BS | Revert seek to the marked position |
The revert-seek mark is the single volatile bookmark, i.e. the timeline position for revert-seek, valid only for the currently playing file.
Copyright © 2025 VideoQ. All Rights Reserved.
Relative Timeline Position
| Key | Action |
|---|---|
| WHEEL_UP | Pause and frame-step forward |
| . | Pause and frame-step forward (MPV built-in control) |
| WHEEL_DOWN | Pause and frame-back-step |
| , | Pause and frame-back-step (MPV built-in control) |
| Shift+BS | Revert seek to the marked position |
| TAB | Pause and seek +1s |
| Shift+TAB | Pause and seek -1s |
| Ctrl+TAB | Pause and seek +10s |
| Ctrl+Shift+TAB | Pause and seek -10s |
| PGUP | Pause and seek +60s |
| PGDWN | Pause and seek -60s |
| Shift+PGUP | Pause and seek +600s |
| Shift+PGDWN | Pause and seek -600s |
Alternatively, use the slider strip within the OSC Bar.
Note that the slider precision is limited, especially for long duration files.
Copyright © 2025 VideoQ. All Rights Reserved.
Chapters
Chapter navigation controls:
| Key | Action |
|---|---|
| WHEEL_UP | Pause and frame-step forward |
| . | Pause and frame-step forward (MPV built-in control) |
- Ctrl+PGUP Next chapter
- Ctrl+PGDWN Previous chapter
Legacy MPV bindings (may or may not be removed in the future):
- @ Next chapter
- ! Previous chapter
Click on highlighted double-arrow symbols within the OSC Bar to see chapter list overlay and go to the next/previous item.

If currently playing file metadata include chapter list, then these symbols are activated (high-lighted).
Copyright © 2025 VideoQ. All Rights Reserved.
Loop
Loop controls:
| Key | Action |
|---|---|
| l | Set / clear A-B loop points (Set A / Set B / Clear AB) |
| L | Toggle file loop playout mode: "inf" (default mode) / "no" (play once) |
Note that in playlist mode selecting "inf" prevents jumping to next playlist file after previous file ends.
Copyright © 2025 VideoQ. All Rights Reserved.
Playlist Manager
| Key | Action |
|---|---|
| Ctrl+p | Switches ON short time display of playlist |
While the playlist is displayed, the following controls are active:
| Key | Action |
|---|---|
| WHEEL_UP,WHEEL_DOWN,UP,DOWN | |
| - if no item selected: Scroll the list | |
| - for the selected item: Move its position in the list | |
| MBTN_RIGHT,LEFT,RIGHT | Modify the selection type |
| MBTN_LEFT,ENTER | Play the item listed at the current cursor position |
| DEL | Removes the hovered item from the playlist |
While the playlist is hidden, the following playout controls are active:
| Key | Action |
|---|---|
| ENTER | Play next item in the playlist |
| < | Play previous item in the playlist |
| > | Play next item in the playlist |
| Ctrl+, | Play previous item in the playlist |
| Ctrl+. | Play next item in the playlist |
If the arrow symbols in the upper-left corner of OSC Bar are highlighted it means that playlist mode is active.
Click on the corresponding symbol to play next/previous item of the playlist.
 Arrow symbols OFF, playlist count = 1
 Arrow symbols ON, playlist count > 1
Note that Recent Files Manager and Playlist Manager are mutually exclusive.
Thus, if Playlist Files Manager was used, the launch of Recent Files Manager will auto-reduce playlist to just one item - currently selected file.
Copyright © 2025 VideoQ. All Rights Reserved.
Working with Playlists
The easiest way to create new playlist:
Select multiple media files and drag-and-drop them into VQMP window.
In such case VQMP creates new playlist, thus replacing the current list.
| Key | Action |
|---|---|
| Ctrl+a | Launches Add File Dialog, the selected file(s) will be appended to the currently opened playlist |
| Ctrl+l | VQMP will search the folder containing the currently playing file |
| and append all files of all supported formats to the playlist | |
| Ctrl+BS | Clears the playlist, except the currently playing file, i.e. playlist is reduced to the currently playing file |
| Ctrl+DEL | Deletes playlist completely and forces VQMP to display start page |
| Ctrl+P | Saves playlist in .m3u UTF8 format |
At any moment press Ctrl+BS to delete temporary playlist and start detailed analysis of currenty playing file.
Note that playlist saving location is fixed: ".\playlists"; file name is created automatically starting with ISO timestamp (no file name edit dialog).
Playlist Scan Mode
Besides the regular playlist mode there is a special "Playlist Scan Mode". By default it is switched OFF.
In this mode each file is playing only for first 12 seconds, AV Monitor and text messages show its video and audio parameters.
| Key | Action |
|---|---|
| Alt+v | Switch Playlist Scan Mode ON |
| Ctrl+v | Switch Playlist Scan Mode OFF |
Fast scan mode is handy for fast preview of large number of media files.
For example, to preview all files in the folder press Ctrl+l (to create temporary volatile playlist), then Alt+v to start playout in the fast scan mode.
At any moment press Ctrl+BS to delete temporary playlist and start detailed analysis of currenty playing file.
Copyright © 2025 VideoQ. All Rights Reserved.
Window Controls
General Window Controls
By default, active video image fits the VQMP window boundaries
Thus, window size affects scaling and zoom factors with reference to the original video frame size.
| Key | Action |
|---|---|
| f,MBTN_LEFT_DBL | Toggle full screen mode |
| ESC | Switch full screen mode OFF |
| T,MBTN_LEFT_DBL | Toggle MPV window staying on top of other windows |
| Ctrl+A | Cycle the rendered video image aspect ratios: |
| "16:9","1.85","2.0","2.2","2.35","2.39","4:3","-1","no". | |
| "-1" means the container/stream metadata aspect ratio | |
| "no" means that ratio = video w/h (aka "square pixels mode") | |
| Ctrl+Alt+a | Toggle the AR metadata source: container/stream |
| Ctrl+N | Create new VQMP instance with empty playlist (start page) |
| Ctrl+D | Duplicate current VQMP instance as new window, |
| playing the same file at the same time position. | |
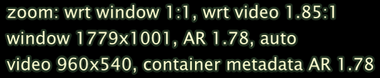
| F9 | Brings up on-screen message showing window size, |
| video size, zoom value, and other related parameters |
See the following sub-sections for more controls.
Copyright © 2025 VideoQ. All Rights Reserved.
Window Size
Except full screen mode, active video image always fits the VQMP window boundaries
Thus, window size affects scaling and zoom factor with reference to the original video frame size.
You can use mouse to drag the VQMP window edges ("easy" Windows OS window size/position change method) without any restrictions. However, in many cases this is not recommended because in this mode it is difficult to control and monitor scaling and zoom values.
| Key | Action |
|---|---|
| Shift+WHEEL_UP,Shift+Up | Enlarge window (max size depends on the screen size) |
| Shift+WHEEL_DOWN,Shift+Down | Shrink window (min window height = 480 pixels) |
| w,W,Ctrl+w | Reset window size to auto-calculated “optimal” values |
| F9 | Brings up on-screen message showing window size, |
| video size, zoom value, and other related parameters |
Copyright © 2025 VideoQ. All Rights Reserved.
Zoom and Pan Controls
The controls listed below affect only the active video image, VQMP window size remains unchanged.
The "smart limits" of the available zoom factor and pan controls depend on video frame size and current window size. E.g., for zoom factor 1:1 both pan controls are blocked/disabled.
| Key | Action |
|---|---|
| Alt+WHEEL_UP,Alt+Up | Increase zoom factor: 1:1, 2:1, 4:1, 8:1, 16:1 |
| Alt+WHEEL_DOWN,Alt+Down | Decrease zoom factor: 16:1, 8:1, 4:1, 2:1, 1:1 |
| Ctrl+LEFT,Ctrl+RIGHT | Move (H pan) visible image behind the window |
| Ctrl+UP,Ctrl+DOWN | Move (V pan) visible image behind the window |
| z,Z,Ctrl+z | Reset video zoom and pan controls to default 1:1 and 0,0 values |
Typically users adjust zoom and pan controls as needed, – simply watching zoomed image area aka ROI.
However, in some cases it is desirable to focus on the particular ROI defined in terms of its x,y position.
In such case real time on-screen messages may help:
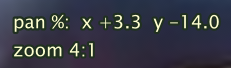

Like many other osd messages they disappear in few seconds after the last change of control values.
Note that zoom scaling filter is always centered on the center of the original image, i.e. x=50% of image width and y=50% of image height. H and V pan controls shift this central point; on-screen messages merely report this shift, the displayed pan % x,y values always refer to the original image width and height.
It is advisable to think about VQMP window as "viewport" limiting visible part of the underlying scaled and shifted image.
The available pan values range is limited to +/-50%. For any zoom factor greater than 1:1, pan% x=+50 and pan% y=+50 mean that upper-left corner of zoomed and shifted image is co-located with the upper-left corner of VQMP window.
Copyright © 2025 VideoQ. All Rights Reserved.
Video Image Processing Controls
There are 3 set of controls aimed to:Copyright © 2025 VideoQ. All Rights Reserved.
Color Space Conversion
Professional color space conversion controls for accurate color representation and measurements.
Color Matrix Selection
| Key | Action |
|---|---|
| Alt+s | Select (force) BT.601 (SD) color matrix |
| Alt+h | Select (force) BT.709 (HD) color matrix |
| Alt+u | Select (force) BT.2020 (UHD) color matrix |
Video Data Range
| Key | Action |
|---|---|
| Alt+f | Select (force) full (aka PC) video data range |
| Alt+n | Select (force) narrow (aka limited) video data range |
By default, color matrix, video data range and dynamic range mode (SDR, HDR-PQ, HDR-HLG) selection is automatic - based on file metadata and video frame size.
Copyright © 2025 VideoQ. All Rights Reserved.
Color Correction
The controls listed below are built-in MPV keybinding, they serve only for subjective image quality enhancement. Opening of new video source automatically reset all these controls to default values.| Key | Action |
|---|---|
| 1 | Decrease contrast |
| 2 | Increase contrast |
| 3 | Decrease brightness |
| 4 | Increase brightness |
| 5 | Decrease gamma |
| 6 | Increase gamma |
| 7 | Decrease color saturation |
| 8 | Increase color saturation |
Note: Image color controls do not affect any video analyzers/indicators, e.g. Video Waveform Monitor.
Any control value change invokes the corresponding text message and large OSC Bar overlays


The ranges for all control values are +/-100, default: 0. MPV controls are very strong, e.g. brightness -100 means solid black, and saturation -100 means shades of gray. Press = if in doubt.
Copyright © 2025 VideoQ. All Rights Reserved.
Image Rotation, Flip and Tumble
| Key | Action |
|---|---|
| Alt+9 | Cycle image rotation: 90, 180, 270, 0 degrees |
| Alt+H | Horizontal flip |
| Alt+V | Vertical flip |
| Alt+x | Disable all 3 rotation and flip filters, shown above |
Original image orientation is reset for each new file opened.
Any change of image orientation invokes the corresponding osd text message.
Copyright © 2025 VideoQ. All Rights Reserved.
Misc Controls
| Key | Action |
|---|---|
| P | Short time display of timeline progress bar |
| i | Short time display of status info pages (aka "stats") |
| I | Toggle permanent display of status info pages (aka "stats") |
| 1,2,3,4 | Browse the stats info pages |
| F6 | Short time display of path + filename or URL |
| F7 | Short time display of media-title |
| F8 | Short time display of video/audio/sub tracks list |
| F9 | Short time display of window/zoom info |
| =,Shift+MBTN_MID | Reset all user controls |
| Ctrl+s | Save scaled video screenshot with subtitles and OSD |
| Ctrl+S | Save unscaled video screenshot without subtitles and OSD |
| F1 | Open VQMP help document in .CHM format |
| O | Cycle OSC visibility: auto (default), always, never |
Note: In "auto" mode OSC (On-screen Controller) bar appears when mouse cursor is in the bottom 25% of the image.
Copyright © 2025 VideoQ. All Rights Reserved.